The step-wise approach demonstrated in this surgical video makes surgery of DDH like a flow chart and the technique is easily reproducible with good success.
Dr. Suresh Chand, Department of Paediatric Orthopaedics, King George’s Medical University, Lucknow - 226 003, Uttar Pradesh, India. E-mail: sureshdocucms@gmail.com
Introduction: It is very common for pediatric orthopedic surgeon to encounter developmental dysplasia of hip (DDH) in walking age, especially in developing countries. The conservative options of management are almost over by this age and most require open reduction (OR) with various adjunct procedures. The most preferred approach for OR in this age group is anterior Smith-Peterson approach to hip joint. These neglected cases also require femoral shortening ± derotation osteotomy and acetabuloplasty.
Case Presentation: In this surgical video technique, we demonstrate OR + femoral shortening and derotation osteotomy and acetabuloplasty, step by step, in a neglected, walking age DDH in a 3-year-old child. We hope that the detailed demonstration and tricks at various surgical steps will benefit our readers and viewers.
Conclusion: Step-wise surgical execution as per demonstrated technique makes the procedure easily reproducible with fairly good outcomes. In this case example, with demonstrated surgical technique, we were able to achieve a good outcome at short-term follow-up.
Keywords: Developmental dysplasia of hip, hip dysplasia, open reduction, acetabuloplasty.
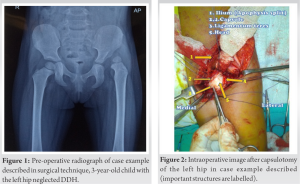
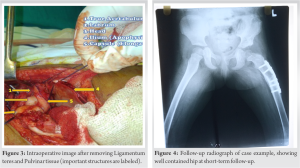
The estimated incidence of developmental dysplasia of hip (DDH) in India is between 1 and 2.6/1000 live births [1]. With the lack of national hip surveillance program and inadequate health infrastructure in general, it is not uncommon to encounter walking age, neglected DDH in outpatient clinic in India. By this age, to have a more predictable outcome, most cases require open reduction (OR) of dislocation with various adjunct procedures, on single stage or later on [2]. It is desirable to have the skillset of OR in pediatric orthopedic surgeon’s armamentarium. Among various surgical hip approaches, anterior hip approach is preferred for neglected DDH. This approach allows good exposure of hip joint, capsulorrhaphy, and acetabuloplasty with same incision, if required [3, 4, 5]. In this surgical video technique, we demonstrate step by step, the OR with Femoral shortening + Derotation Osteotomy and Acetabuloplasty in a 3-year-old girl with neglected DDH left hip (Fig. 1, 2, 3, 4). We have demonstrated important surgical steps with commentary in English language. Vital steps are also described in methods section (marked with timing on the video) (Video attached as supplemental file). We hope this will benefit our readers and viewers.
The video here demonstrates OR with Femoral shortening + derotation Osteotomy and Acetabuloplasty in a 3-year-old girl with neglected developmental dysplasia of left hip (DDH). After proper consent, child is taken in operation theater (OT), under general anesthesia. Patient is positioned on radiolucent OT table, with a bump under pelvis, so that pelvis is tilted 10–15 degrees to opposite side (Video time: 0.40 Min). This position gives ease in exposure of hip joint and Iliac crest. You will need to adjust C-arm accordingly. In neglected cases, adductor tenotomy is almost always required (unless the child has severe ligamentous laxity and there is no limitation of abduction). Perform adductor tenotomy percutaneously (Video time 0.52 Min). Now, proceed to anterior hip exposure through Smith-Peterson approach using bikini incision (Video time 1.00 Min). This incision gives a cosmetic scar and proximal curved part of incision can be utilized for acetabuloplasty as well. Isolate and protect lateral cutaneous nerve of thigh while you identify plane between sartorius and tensor fascia lata (TFL) [6] (Video time: 1.20 Min). Tag sartorius with sutures and erase it for retraction downward (Video time: 1.50 Min). After this, identify the direct head of rectus tendon and tag it with sutures. We do not detach rectus tendon at this moment, as this will guide our dissection later while we come down from iliac crest (Video time: 2.15 Min). Expose Iliac crest and split the iliac apophysis using sharp knife. Clear the iliac blade on both sides using packing gauge (Video time: 2.35 Min).
Now, dissect down from Anterior superior iliac spine to Anterior inferior iliac spine. Here, we find tagged rectus tendon. Erase it and reflect down (Video time: 3.13 Min). After this, isolate the psoas tendon medially. Remember that your assistant is protecting medial important structures with a retractor. Confirm the Psoas tendon by rotating the limb, cut it with knife or cautery (Video time: 3.30 Min). Now, expose the hip capsule and detach all the adhesions. You can utilize blunt dissection to release adhesions between hip abductors and capsule. Mark the capsule in “T” shape and tag with port vicryl for later ease during capsulorrhaphy (Video time: 4.15 Min). Perform capsulotomy, cut the ligamentum teres and trace it to reach true acetabulum. Now clear the acetabulum of all the pulvinar tissue using disc/punch forceps (Video time: 4.40 Min). Sometimes, you may need to release transverse acetabular ligament. After clearing the acetabulum, we now try and reduce the hip joint. Check the stability in various positions, called as ‘intraoperative test of stability’ [7, 8, 9] (Video time: 5.0 Min). Based on findings of this stability test, we decide for adjunct procedures. In this case example, we see that reduction is tight, abduction is limited and there is an anterior un-coverage. Hip is relatively more stable in Flexion, abduction and 30–40 degree of internal rotation. Now, we go ahead to the femoral side and we expose the femur with the standard lateral approach (Video time: 5.35 Min). Cut the TFL and expose vastus lateralis. Gradually split the muscle distally. Elevate the periosteum, put the plate provisionally to see the level of osteotomy (Video time: 6.42 Min). Pre-drill the proximal screws of the plate. Mark the osteotomy site (Video time: 6.55 Min). Now, mark the femur anteriorly in line so that we have a guide for the rotation later on (Video time: 7.05 Min). Pre-bend the plate with roughly 20 degrees for varusization after osteotomy (Video time: 7.20 Min). Before doing osteotomy, pass a wire retrograde from femoral head to laterally. This wire will be used for trans-articular fixation later as well as helps in better control of small proximal fragment after osteotomy. (Video time: 7.35 Min). Now, we do the femoral osteotomy at the site already marked. After osteotomy, hip joint is reduced by holding the proximal fragment, using k-wire as joystick. After hip joint reduction, look at the overlap at the femoral osteotomy site with gentle tension. This will guide us in estimating the amount of femoral shortening required (Video time: 8.25 Min). Now, we do the femoral shortening. Mark the derotation guides we had already drilled (Video time: 8.53 Min). Fix the plate on pre-drilled holes on proximal fragment. Reduce the fragments and with the guide marks, adjust the rotation required. Your assistant can hold the limb in desired rotation, while you hold the plate and fix remaining screws (Video time: 9.20 Min). After this, we come to the left iliac blade region. Under C-arm guidance, mark the initiation point for acetabuloplasty [4] (Video time: 9.50 Min). Always check that you are at the right level. Start drilling the lateral cortex and under C-arm guidance use osteotome gently to cut it. You may need to take multiple C-arm shots during this process. Make sure that the osteotome is perpendicular to the plane of the pelvis and directing medial and downward (Video time: 10.30 Min). Medial cortex is left intact during this process. Gradually, open this osteotomy by gently pulling the osteotome down (Video time: 11.0 Min). Now, harvest the triangular bone grafts from the Iliac crest (Video time: 11.15 Min). With the help of a lamina spreader, open the acetabuloplasty site and put the triangular grafts in the anterolateral region, one-by-one (Video time: 11.50 Min). Under the C-arm image, we can see that the acetabular index has improved. Acetabuloplasty is stable and grafts are well secure by elastic recoil of ilium. Now, reduce the hip joint and pass forward the k-wire for trans-articular fixation (Video time: 12.52 Min). Now, carefully perform capsulorrhaphy, do it with the suture tags already in place on the capsule [10] (Video time: 13.10 Min). Bend the k-wire and cut it outside skin. Close the wound in layers. Apply one and half hip spica in standard fashion. The post-operative protocol is to maintain spica for 6–8 weeks followed by abduction brace for another 6–8 weeks (Video time: 13.27 Min).
The surgical steps have been described thoroughly in the surgical video. Anterior hip approach using Bikini incision gives good exposure to both hip joint as well as iliac crest [5, 6]. The scar is also very cosmetic and acceptable to patients. All the important technical tricks at each stage have been demonstrated nicely. With surgical steps of this technique, we believe that OR and adjunct procedures of walking-age DDH are easy to perform with good results. The “Intraoperative test of stability” is useful tool to help surgeon to determine the need of derotation, varusization, or acetabuloplasty [7, 8, 9]. However, surgeon’s preference and training might play a role in ultimate choice of procedures performed. Use of trans-articular k-wires and post-operative protocol varies from surgeon to surgeon.
In this case example, with demonstrated surgical technique, we were able to achieve a good outcome at short-term follow-up. The hip clinically and radiologically reduced and is stable. The acetabular index has also improved and child is doing functionally well. We believe that this technique is easily reproducible with fairly good outcomes in well selected cases.
Step-wise surgical execution during OR of DDH removes all the obstructions to stable reduction and makes it hassle free job for surgeon and operating team. Intraoperative test of stability is a useful guide to determine adjunct procedure after OR for more predictable outcome especially in walking age DDH.
References
- 1.Chand S, Aroojis A, Pandey RA, Johari AN. The incidence, diagnosis, and treatment practices of developmental dysplasia of hip (DDH) in India: A scoping systematic review. Indian J Orthop 2021;55:1428-39. [Google Scholar]
- 2.Talathi NS, Trionfo A, Patel NM, Upasani VV, Matheney T, Mulpuri K, et al. Should I Plan to Open? Predicting the need for open reduction in the treatment of developmental dysplasia of the hip. J Pediatr Orthop 2020;40:e329-34. [Google Scholar]
- 3.Herring JA. Tachdjian’s Pediatric Orthopaedics. 5th ed. Philadelphia, PA: Elsevier Saunders; 2014. [Google Scholar]
- 4.Venkatadass K, Durga Prasad V, Al Ahmadi NM, Rajasekaran S. Pelvic osteotomies in hip dysplasia: Why, when and how? EFORT Open Rev 2022;7:153-63. [Google Scholar]
- 5.Jia G, Wang E, Lian P, Liu T, Zhao S, Zhao Q. Anterior approach with mini-bikini incision in open reduction in infants with developmental dysplasia of the hip. J Orthop Surg Res 2020;15:180. [Google Scholar]
- 6.Rudin D, Manestar M, Ullrich O, Erhardt J, Grob K. The Anatomical course of the lateral femoral cutaneous nerve with special attention to the anterior approach to the hip joint. J Bone Joint Surg Am 2016;98:561-7. [Google Scholar]
- 7.Zadeh HG, Catterall A, Hashemi-Nejad A, Perry RE. Test of stability as an aid to decide the need for osteotomy in association with open reduction in developmental dysplasia of the hip. J Bone Joint Surg Br 2000;82:17-27. [Google Scholar]
- 8.Sankar WN, Tang EY, Moseley CF. Predictors of the need for femoral shortening osteotomy during open treatment of developmental dislocation of the hip. J Pediatr Orthop 2009;29:868-71. [Google Scholar]
- 9.Sankar WN, Young CR, Lin AG, Crow SA, Baldwin KD, Moseley CF. Risk factors for failure after open reduction for DDH: A matched cohort analysis. J Pediatr Orthop 2011;31:232-9. [Google Scholar]
- 10.Badawy MY, Afifi A, Shaker ES, Elbarbary H, Hegazy M, Mohamed MT, et al. Is capsulorrhaphy a necessary step during open reduction of developmental dysplasia of the hip? A randomized controlled trial. Int Orthop 2022;46:589-96. [Google Scholar]


